How to Use Auxiliary Lines When Carving Wooden Gifts
In this blog post we will teach you how to draw auxiliary lines when making wooden gifts. Drawing the necessary auxiliary lines on a block of wood is a crucial first step that will provide you with an accurate guide on space, rather than carving all from your imagination.
Let's continue with the mushroom wood figurine example from the previous post. When we are in the initial stages of drawing, it is a good idea to find two auxiliary lines, the center line, and the boundary line.

How do you find the center line on a wood block?
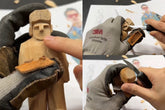
The center line is better understood as a line divided in half from the center, either horizontal or vertical lines can be drawn on the wood block. Using the wooden block in the picture as an example, use a straightedge to measure 2.5 centimeters each, and then draw the midline in both the horizontal and vertical positions of the block. Since the blocks we use are often 5 cm, a fixed-size caliper can be used to facilitate the drawing and allow the centerline to be drawn quickly.


We cut on all four sides when we cut, so it is best to draw the centerline on all four sides. After drawing the horizontal and vertical center lines, we can translate the design of the mushroom wood figurine to our block. This step focuses on removing excess wood. However, using the Quick Saw will only cut straight lines, so the rounded curves of the mushrooms can be disregarded in this step.

What is the Boundary Line for Carving a Wooden Figurine?
In the second step, let's find the boundary lines. The structure of this wooden mushroom is relatively simple, with only two main parts: the cap and the tip. Take the design drawing in the case as an example, the overall height of the mushroom is 8 cm, in which the distance between the highest and the shortest part of the mushroom umbrella is 4.5 cm, and the rest of the part is 3.5 cm.
From this we can derive the corresponding proportions between the various parts of the mushroom, i.e. the mushroom umbrella is slightly larger than the rest. We can tell that this demarcation line at the bottom of the mushroom umbrella should be a little below the center line of the block, at which point we can draw a mark on the block with a pencil, and this mark can be called the demarcation line.

Marking the part to be cut
We have just used the front view as a reference, at this point imagine a side view of the wooden mushroom gift. The side of the mushroom is the same as the front, so the lowest part of the mushroom umbrella will be in the same position. To do this, we extend the dividing line we just drew on the wooden block to each side.

Next, we look at the lower part of the mushroom, the mushroom tip, which is narrower than the mushroom umbrella. After we measure it using a ruler, we mark the narrow part on the wood block, drawing a shadow to remind ourselves that this part is the one that needs to be cut away. Mark all sides of the block and the bottom as they all need to be cut away as well. The bottom of the mushroom should be round, and we can draw a circle in this step.

Summarizing
The wooden mushroom figurine in this post is a very simple structure, but the method of finding the centerline and boundary lines in our instruction applies to all the steps of drawing wooden gifts. Wood carvers don't just use saws and carving knives based on their imagination alone when making wooden gifts; cutting wood is always predicated on first drawing a draft with auxiliary lines on a block of wood based on a design.
