Unique Wooden Gifts: Unhappy Bear Carving Ideas
Hello everyone, this blog will continue with tutorials for making interesting wooden gifts. This time the idea is an unhappy wooden bear figurine, because the bear doesn't want to go to work, he is very unhappy on Monday, is it true that you are also like him? We will teach you to make it step by step, starting from drawing a draft to carving and finally painting it with cute eyes and expressions.

Step 1: Draw the front and side view of the bear figurine on a rectangular basswood block.
Draw a draft in this step, prioritize the front view of the wooden bear, followed by the side views on both sides, please calibrate the side view with the front view and make sure they are aligned with each other. Finally draw the back view of the bear. The key to calibrating the front and side views is to make auxiliary lines so that the key parts of the bear are on a horizontal line. Here are the areas where you need to make auxiliary lines:
- The bear's nose.
- The bear's mouth.
- The bear's chin.
- The chest above the bear's arms
- The bear's paws.
- The junction of a bear's legs and feet.
Both the left and right views need auxiliary lines drawn to align with the front view. A center line needs to be drawn in the front view to ensure that the bear's body is symmetrical. One extra thing to note in the left and right-side views is that you need to set the height for the bear's paws. When you have done these steps, you will get a correctly proportioned bear for later cutting. If you are a beginner in wood carving, remember that drawing a draft is the most important step that will enable you to make beautiful wooden gifts.

Step 2: Chipping off the excess wood from the block and cutting out the bear shape.
This step cuts the wood block along the outline lines drawn in the previous step, but please be careful to leave some width and not cut completely on the lines. Priority is given to cutting in the side view, when you cut off the excess wood you will notice that the draft drawn in the front view is missing, you will then need to draw the front view of the wooden bear again, this is not redundant work and you will find that the second time you draw the front view it will become more accurate. Once you have done this, cut along the contour lines in the front view, again leaving some width to ensure that the contour lines are still visible after the cuts have been made.


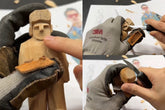
Step 3: Use a wood carving knife to carve lines into the body, dividing the body from the arms.
Only the carving knife is used in this step, no more saws. Carve the square shape of the bear towards roundness. Some parts need to be clearly delineated, including:
- The bear's ears.
- The neck of the bear.
- The bear's arms and body.
- The bear's legs and feet.

Step 4: Carve the bear's feet and do the final sanding.
This step will carve both feet of the bear, separating the feet that were originally one piece. Use sandpaper to round off the corners of the entire bear figurine, but don't over-sand, just lighten the corners. Finish by painting the bear with cute eyes, nose, mouth and nails on the hands and feet. The easiest way to do this is to use pencil drawings but use water-based dyes if you want to keep it permanently. Some wooden gifts are painted in their entirety and others are left in their original wood color, depending on your aesthetic, if you find the original wood color more pleasing to the eye, then your work is done.


To summarize
The wood carving ideas shared in this post are between easy and medium in difficulty. The hardest part is the cutting of the bear's feet, which requires the use of a carving knife to carefully split the two feet. Secondly, excellent drawing skills and the good habit of always replenishing auxiliary lines are the key to making great wooden figurines. We hope you enjoyed this bear who doesn't like to work, and we'll see you in the next post.


