Adorable Polar Bear Wooden Gifts: Part 2
This is the second in a series of tutorials on carving wooden polar bear figurines, which will introduce the details of the carving of each body part. After this tutorial, you will be able to follow our motion picture and text instructions to carve your own piece of art, and you will have gained some experience in making wooden gifts of the bear figurine type.

Marking out the most raised part of the Polar Bear Wooden Gifts
Let's start by looking at the polar bear figurine and identifying the highest point. In the center of the circle-shaped head, mark the nose, which will be the highest point (the most raised part) of the entire wooden gift. Similarly, the back of the head is the highest point on the back, which we mark with a painted circle.

Drawing auxiliary lines
To carve wooden gifts you need to draw the lines first, now we draw the center line, which is the very center of the front, the sides, and the center lines of the head, body, arms, and legs.

Carving the head
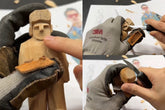
After drawing the auxiliary lines, we use the carving knife to start carving from the head. From the edge of the face down the knife, from the bottom to the top of the cut, cut to the ear area can be, so that the face into a round. Once the upper part of the face is finished, we start with the lower part.


We're going to start around the neck and note that the highest point in the front view has a dividing line between the nose and the neck and the body, which we need to make.

Carving the body and arms
Once we've cut out the demarcation line, we'll start cutting the body, starting at the edges, and gradually transitioning to the center.

When we round off the body, the arm is a bit of a hindrance, so let's carve out the arm first and then move on to the body.

For the arm, we have drawn auxiliary lines, cut off the corners between the lines and turn it into a circle. With one side of the arm finished and out of the way, we move on to rounding the body.

When this is done, the other arm also gets in the way of the carving knife, and we repeat the same operation as before, rounding it off.

When both arms have been rounded and there are no more angles that can obstruct the carving knife, we will continue carving the body part.

Leg Carving
After we have finished carving the body and arms, we begin carving the legs.

For the legs, we just need to remove the drawn auxiliary lines and make a few deep cuts towards the body joints to make the demarcation line between the legs and the body parts visible and layered.


At this point, our work is complete, then carefully observe where there are flaws, use the carving knife to refine it.

Summarize
Wooden polar bear figurine carving difficulty is medium, it is difficult mainly in the body parts of the joints need to be handled as smooth as possible, as well as the drawing of the proportion of each position needs to be accurate, in addition to the carving should be as close as possible to the position of the auxiliary line. These factors are the key to making a lovely rounded polar bear, and we believe that novice woodcarvers will be able to accomplish it with practice.
