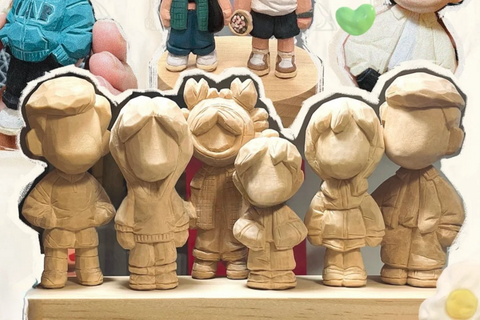
How to Finish Small Wood Carvings
Finishing a small wood carving begins with the surface you want to keep. You can leave crisp knife facets, smooth selected areas, show the grain through a clear finish, or paint the figure in solid colors. Make those choices before sanding or opening a coating: they determine what preparation the wood needs and which products can work together.
This guide follows a small indoor display carving from final cleanup through color, an optional protective topcoat, and drying. Start with sound, dry wood and a shape you are satisfied with. Repair loose joints and complete any other repairs before moving to the surface.
1. Choose the look before choosing a finish
Turn the figure under a light and decide where the cut texture contributes to its shape. A faceted coat or textured hair can remain crisp while a face or hand receives more smoothing. You do not have to sand every part to the same surface.

| Result you want | Route to consider | What to check first |
|---|---|---|
| Visible wood with a clear surface coating | A clear finish approved for indoor wood | Its effect on the wood color, sheen, preparation, and drying requirements |
| Visible grain with a warmer color | A wood-finishing oil or oil-and-varnish blend | The actual formulation, how much excess must be removed, and any later topcoat restrictions |
| A buffed wax finish | A wax made for the intended wood surface | Whether you can reach the recesses to remove excess and buff it, and whether you will want another coating later |
| Solid colors and a clearly defined face or costume | Opaque paint approved for wood, with a compatible topcoat if required | Primer or sealer requirements, paint opacity, and whether the paint needs a separate clear coat |
Product names do not describe one universal recipe. For example, WATCO Danish Oil is an oil-and-varnish blend intended for indoor use. Its instructions require removing excess rather than leaving a wet layer in the carving's grooves. Briwax's wax instructions call for a very thin application and buffing; a heavy deposit is harder to polish. Choose one route before adding other products.
For a first painted display figure, a wood-compatible acrylic craft paint and a clear coat explicitly recommended for that paint are a practical combination. For a figure whose wood should stay visible, start by testing a clear wood finish on a matching offcut. Neither choice requires buying an oil, wax, primer, and varnish to stack together.
2. Finish the carving, then sand only where needed
Look for loose fibers, unintended ridges, pencil marks, and glue residue. A coating will not correct the shape of a deep cut or a raised glue joint. Address those before painting; keep the useful boundaries around eyes, fingers, clothing folds, and other small features.
Use hand sanding where it gives you control. Start with the least aggressive abrasive that removes the unwanted marks, then work finer until the previous scratches are gone. Stop at the preparation recommended for your chosen coating; very fine abrasive is not automatically the right final preparation.
- Flat areas: support the abrasive on a small flat block so that the pressure stays even.
- Broad curves: use a flexible abrasive that follows the shape without rubbing away its edges.
- Narrow recesses: use a small piece that reaches the intended surface. Stop if you are sanding the surrounding detail instead.
Work along the grain where the shape permits, check the surface often, and replace a clogged or worn piece of abrasive. Norton's hand-sanding guidance explains the roles of abrasive grade, blocks, flexible sheets, and sponges.
Collect sanding dust and clear it from recesses before applying a coating. Keep the work area clean with extraction and suitable vacuuming; do not blow dust into the air with compressed air. CCOHS wood-dust guidance covers dust control and cleanup. If your finish calls for wiping the wood with a damp cloth, let the wood dry before the next step.
3. Plan the layers and make a small test
Read the directions for the actual paint and finish together. Write down the preparation, layer order, recoat interval, and time before handling or use. Check whether the chosen product goes on bare wood, under paint, or over dried paint. Set up the ventilation and any protective equipment required by the product label before applying the first layer.
A preparation sealer and a final clear coat do different jobs. For example, DecoArt Multi-Purpose Sealer is intended to prepare raw wood before painting; DecoArt recommends its DuraClear varnishes for protecting a finished painting. Do not treat every bottle labeled “sealer” as interchangeable.
Make a test on an offcut of the same wood, prepared as you intend to prepare the carving. Include the same paint, any primer or sealer, and the proposed topcoat in the same order. Let the test reach the relevant drying stages, then look for color changes, lifting paint, uneven absorption, and an unwanted sheen.
A clear layer can alter the appearance of a light or white paint. General Finishes discusses color shifts and compatibility, including why some of its white paints should not receive a clear topcoat. A product that dries clear by itself does not guarantee an unchanged color over every paint and wood combination.
4. Add color if you want a painted figure
Acrylic craft paint can itself be water-based; “water-based paint” and “acrylic” are not opposing quality grades. Choose by the actual product's suitability for wood, coverage, working properties, and finish. DecoArt Americana Acrylics, for example, lists wood among its surfaces and gives brush or sponge application instructions.
Decide between opaque color and a translucent effect. Solid color can cover the grain and help make facial details readable. A wash leaves more of the underlying surface visible. Use the paint maker's dilution or medium instructions for a wash; adding an arbitrary large amount of water is not a substitute for a suitable formula. GOLDEN's wood-staining guide illustrates how specified acrylic products and mediums can produce a transparent color route.
- Prepare the base. Apply a compatible preparation layer only if your chosen paint system calls for it. Let it dry as directed. A white ground can be a color choice, but it is not compulsory for every wooden figure.
- Paint the larger color areas. Load a brush lightly enough to control the edge of each area. Keep the carved lines open instead of filling them with paint. Build the required coverage according to the paint's directions.
- Let the base dry before the fine marks. Add eyes, eyebrows, mouth lines, or clothing details with a brush that gives you control at that scale. Avoid repeatedly dragging fresh color through a layer that is still soft.
- Check the figure from several sides. Look for missed patches beneath the chin, around arms, and beside the base. Correct the color while preserving the carved boundaries.

In this rounded character, the body receives yellow-brown color while the eye areas are reserved for white; the small black facial marks come afterward. That order gives each brush a defined job. Use your paint's drying instructions before adding the next color.
Opaque paint may make a repair's color difference less visible. It does not rebuild missing wood or strengthen a weak joint. A raised seam still needs surface correction, and a transparent finish may leave that seam visible. Finish the repair before trying to disguise it with color.
5. Apply the chosen clear finish without filling the details
If you are keeping the wood visible, follow the clear finish's preparation for bare wood. If you are coating paint, wait until that paint is ready for a topcoat and use the combination you checked on the test piece. A separate clear layer is optional when the chosen paint is already intended to serve as the finished surface.
- Mix the product as directed. Some finishes require stirring and others shaking. Minwax instructs users to stir Polycrylic without shaking; DecoArt tells users to shake DuraClear. Follow the bottle or can in your hand.
- Use an appropriate brush and a controlled coat. Work around the form in small, reachable sections. Keep a stable hold or support that does not contact wet areas.
- Check the recesses while the coating is still workable. Look below the chin, under arms, along clothing grooves, and around the base. Spread out excess before it becomes a run or a thick deposit. Do not keep brushing a layer that has begun to set.
- Let the coat dry, then inspect. Follow the product's instructions for any sanding between coats. Avoid cutting through color on raised edges. Remove the resulting dust before recoating.
- Complete the specified coat schedule. Add coats only as the chosen system requires. More layers are not a remedy for cloudy, soft, or incompatible layers underneath.
Minwax's clear-finish guidance explains why thick coats and sanding before the film is ready can cause problems. For the mixing and application requirements of the named examples, see Polycrylic and DuraClear.
If you chose an oil or wax route instead, use its application and removal method. In particular, wipe away the excess that an oil's directions require, or remove and buff a thin wax application as specified. Do not add a water-based topcoat over an oil or wax simply because each product is suitable for wood; verify the exact combination first.
6. Separate drying, recoating, and curing
A dry-looking surface is not necessarily ready for another layer, packing, or normal handling. The product instructions may give different times for each stage:
| Stage | What it means for the carving |
|---|---|
| Dry to the touch | The surface has reached an early drying stage. This alone does not mean it is ready for another coat or wrapping. |
| Ready to recoat | The next compatible layer can be applied under the product's stated conditions. |
| Ready for handling or use | The coating can tolerate the level of handling described by the maker. |
| Fully cured | The coating has completed the longer development period identified in its instructions. |
The difference can be substantial. DecoArt lists an average touch-dry time of 20–30 minutes and full cure of 5–7 days for Americana Acrylics, with conditions affecting the result. Those figures apply to that paint, not every paint or varnish. Check the current instructions for each product in your own sequence.
Keep the piece in a clean, ventilated drying area within the specified temperature and humidity range. Avoid touching or wrapping the wet finish. Do not use heat to rush a product unless its maker expressly permits that method. Before giving or packing the figure, allow the finish to reach the required handling or use stage and check the full-cure guidance.
Clean brushes and manage waste according to the products used. Keep oil- or solvent-wet cloths out of a pile of ordinary trash; the U.S. Fire Administration recommends a tightly sealed metal container for these rags. Follow the coating label and local disposal instructions.
Check the result before adding anything else
| What you notice | What to do next |
|---|---|
| Scratches become more obvious after coating | Do not try to bury them under thicker finish. Let the coat reach its required drying stage, then use the maker's correction method; deep scratches may require returning to surface preparation. |
| Paint or clear coat collects in a carved line | While still workable, spread out the excess. If it has set, allow it to dry and assess the correction instead of dragging it through neighboring details. |
| The finish stays cloudy or develops a blue cast | Check the specific product, application thickness, conditions, and drying time. Some coatings look milky when wet, but a persistent color cast is not automatically normal. Pause further coats and consult the maker. |
| Sanding between coats produces gummy particles | Stop. The film may not be ready for sanding. Recheck its drying requirements and wait before testing again. |
| A glued repair still shows through | Distinguish a raised seam from a color difference. Correct the shape before choosing more color; clear finish does not promise an invisible joint. |
A finished display carving should retain the shape and details you intended, have the surface and color you chose, and reach the coating's required drying stage before handling. Keep a note of the products and layer order so that a later touch-up starts from known materials.