Carving Small Wooden Figures: From Drawing to Paint
A small figure becomes easier to carve when you decide its main shapes before working on individual details. These workshop examples follow that process from a drawing on a blank through shaping, clothing details, surface preparation, and painting. The emphasis is on what to compare at each stage so you can keep the whole figure coherent.
The examples use compact, stylized people with simple faces and distinct hair and clothing. They are suited to carvers who already have basic knife control and some experience reading a shape from more than one view. Several different figures appear in the photographs; use them to compare decisions, without assuming that every picture shows one object progressing in a straight sequence.
Choose the silhouette and the features that carry the character
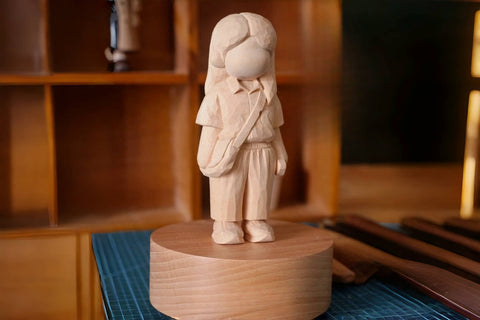
Begin with a front view that makes the pose, head size, hair, and clothing recognizable as broad shapes. The group of finished carvings shows how different hair outlines and body proportions can distinguish a character before painted eyes or tiny decorative lines are added.

Draw the side view as well. Give the forehead, back of the head, clothing, and shoes the depth they need. If a photograph does not show a side clearly, use another view or study the person and garment before committing that area to a final outline. Keep uncertain areas generous.

The blank used in this example measures 10 × 5 × 5 cm. Choose the size for your own design; the measurement is not a required proportion for every figure. Set the feet against a consistent baseline and carry the chin, waist, and lower-clothing guides across the front and side.
Before cutting, check that the head and feet occupy the same height in both views and that any protruding feature has room. A drawing that fits the front can still leave too little wood for the profile.
Remove the marked waste and restore the drawing
Use the front and side drawings together to identify the areas outside the figure. Secure the blank for sawing, and check each cut against both views. Leave a margin around the final outline, especially near the head, neck, and other narrow connections.

The workshop photographs show saw kerfs used to divide the waste before it is removed with a chisel. Read the grain on the actual blank and use only a tool designed for mallet work if you choose that method. The words top and bottom do not identify the grain direction, and an ordinary carving knife should not be treated as a struck chisel.

Remove the waste in controlled stages, then inspect the new surfaces. Do not assume a large strip will split exactly along a drawn line. Stop and reassess if the split is running toward the figure.
Redraw the lines that disappeared with the waste. In the red-marked areas, restore the head and lower-body guides on the newly exposed faces. Refer back to the original drawing and the lines that remain, rather than copying the changed outline by eye.

The checkpoint is a readable figure from the front and profile, with space still reserved for the final contours. The drawing will need to be renewed again during carving; it is part of the process rather than a one-time transfer.
Develop the head, torso, legs, and shoes together
Reduce the cutout to broad masses before making narrow grooves. Work through the head, torso, legs, and shoes, then compare them as a whole. The first progress panel shows that these forms remain simple while the overall front and side relationships are established.

Compare the width of the head with the shoulders, the depth of the torso with the profile drawing, and the position of the legs above the shoes. When one area looks too large, confirm it from another view before taking a substantial shaving. A wide front view can hide a thin side profile.
Round the block corners selectively. Keep the volume that belongs to the hair and leave room beside the body for the arms, clothing, or a bag. Treat each reduction as a change to an adjoining surface, so an arm does not become thin simply because the torso beside it was reduced first.
Pause before details when the pose is clear, the feet still support the intended stance, and the head and body look related from more than one angle. If those checks fail, keep working on the larger masses. Fine lines will not correct a misplaced shoulder or an undersized head.
Refine the smaller forms before adding grooves
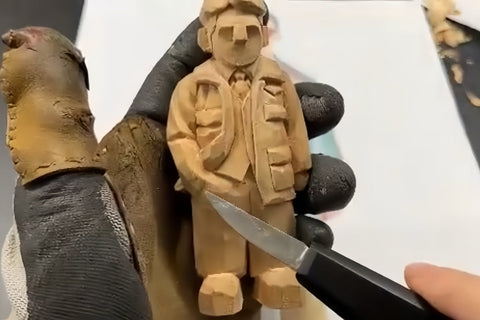
Move to a smaller blade where it gives useful control and access. The refinement panel shows the hair, sleeves, bag, and shoes becoming separate readable forms while the figure is still checked as a whole. Pick one boundary, lower the adjoining surplus a little, and compare the result before deepening it.

For hair, establish the direction and height of the main masses before cutting narrow divisions. For clothing and a bag, identify which surface overlaps the other. Keep the outer form high enough to read after the neighboring surface has been reduced.
Use a small V-tool to add short decorative or structural grooves after the underlying shape is settled. The detail panel shows them on garments and shoes. Keep their depth and width in proportion to the small figure; additional grooves should explain a seam or fold rather than cover an unresolved surface.

Check the same details from the side and back. A bag should connect naturally to its strap and body, a sleeve should lead into the hand area, and a hair edge should continue around the head. Stop adding marks when the larger forms already communicate the design.
Choose which surfaces to leave faceted and which to smooth
The comparison figure shows two different surface treatments: visible carving facets and a more rounded finish. Either can suit a stylized figure. Decide which character you want the surface to have before sanding away the tool marks.

Trim loose fibers with a light cut and brush away debris. Sand the areas you want smoother, such as the broad face in these examples, while keeping the small clothing edges and grooves readable. Work on the mark that needs removing rather than pressing indiscriminately over every raised detail.
The pictured abrasives record the workshop approach, not a mandatory grit sequence. Choose the starting abrasive for the remaining marks and follow the preparation guidance for the paint or clear finish you intend to use. Check the surface between passes and remove sanding dust before coating.

Before painting, inspect the carving under light from the side. Look for loose fibers, accidental ridges, or dust caught in grooves. Finish shaping now so that a later correction does not require cutting through completed paintwork.
Paint a small, controlled color scheme
The painting panel moves from the bare figure toward larger areas of color and then the smaller facial and clothing details. In this example, the lighter areas are established before the darker ones. Treat that as one workable sequence for the shown design, and plan the order for the colors and paint you are using.

Choose a paint intended for the surface and finish system. Water-based and acrylic are not opposing categories: acrylic paint can be water-based. Test the chosen paint on a scrap of the same wood, or on a comparable prepared surface, to see how it covers and how the color looks when dry.
Keep a limited set of colors and compare them together before adding small accents. If mixing a repeatable color is difficult, using a prepared shade can help maintain consistency. Work with small amounts and follow the product instructions for thinning and drying rather than assuming that every water-based paint accepts the same dilution.
Leave the finer painted expression until the larger color areas are clear and sufficiently dry for the next layer. Add the eyes and mouth to the simplified wooden face as shown, keeping them in proportion to the head.
Test the clear finish over the actual colors
If the painted figure needs a clear topcoat, select one that is compatible with the paint and intended use. Test the full sequence on a sample, including the darkest color, before coating the figure. Follow the specified drying and recoating conditions for the products you choose.
Apply thin, even coats without allowing finish to pool in the small grooves. Add water or another thinner only if the product instructions call for it. Use the mixing ratio, drying interval, and curing conditions specified for that finish.
Do not assume that a blue or cloudy appearance after drying is normal. Some water-based coatings look different while wet, but persistent haze can have several causes. Stop adding coats to the figure, check the test piece after the stated drying period, and use the manufacturer’s guidance for that coating.
Once the coating has reached the condition specified for handling, check for missed areas, pooled finish, and changes in the dark colors. A successful finish should preserve the clothing edges and chosen surface character as well as the color scheme.
Use the same checks whenever you make another small character: establish the silhouette in more than one view, keep the main masses in proportion, refine only the details the design needs, and test the surface treatment before applying it to the figure. The particular hairstyle or outfit can change while those decisions remain useful.