Carve a Wooden Head: Nose, Ears, and Hair
This example develops a simplified head on a small wooden figure. The nose, ear shapes, jaw, and side-parted hair carry the expression. On this small basswood figure, delicate facial features would leave little wood and little room for correction. The face is deliberately spare; the sequence does not add detailed eyelids or a carved mouth.
Begin with the head and body masses already blocked out and enough wood left for the nose, ears, and hair. Keep a clear reference beside the work. Turn the figure frequently, and judge the front, profile, and top together before removing more material.
Establish the nose and the surrounding face planes
Round the back of the head gradually while keeping the front broad enough to develop the face. Draw a centerline and mark the nose before cutting around it. In this design, the nose is the most prominent facial mass, so the surrounding face must be reduced while the nose itself remains reserved.


Make shallow stop cuts beside the marked nose, then remove small shavings from the adjacent face. For this small head, the first cuts are about 2 mm deep; use the size and remaining wood to judge a suitable depth for your carving. Reassess the projection before deepening a cut.

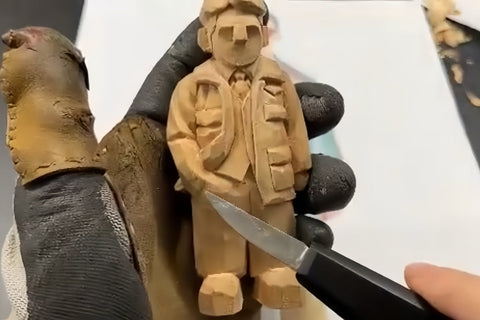
Turn the figure to find a controlled cutting direction. In the inverted views, the carver approaches the face from a different angle to remove a thin layer. Use a slicing cut that releases the shaving; do not use the knife tip as a lever to pry out a chip. Keep the holding hand outside the blade path, whichever working angle you choose.


Compare the profile with the front after each reduction. A nose can appear tall from the front while still lacking room in profile. Leave enough width on both sides for the upper face and the later ear and hair boundaries.

Continue in thin layers until the nose stands clearly above the surrounding face; the recess reaches roughly 3 mm in this small example. Clear the surplus beneath the nose base to meet the adjoining lower-face plane. Use the remaining wood and intended proportions to decide when to stop, rather than treating 3 mm as a target for every head.

Carry the facial guides around to the ears
Refine the lower face beneath the nose while leaving room for the hair. Mark the brow area and the base of the nose, then extend those guides around the sides of this head. They locate the ear blocks at a consistent level; compare them with the reference for this figure.


Look across the head from above as well as straight at the face. Compare how much wood remains on either side of the nose and where the ear blocks sit behind it. Correct an obvious imbalance while the surfaces are still broad.
Reduce the area around each ear only a little at a time. Keep the ear itself and the hair above it as reserved masses. Cutting either boundary to its final depth now would leave less freedom to adjust the sideburns and head width.


Redraw a guide whenever a cut removes it. Shape the nose into a slope from its bridge toward the tip while keeping the hair volume above it. Recheck the ear levels and the room left for the forehead before deepening either area.

Separate the hairline from the forehead and sideburns
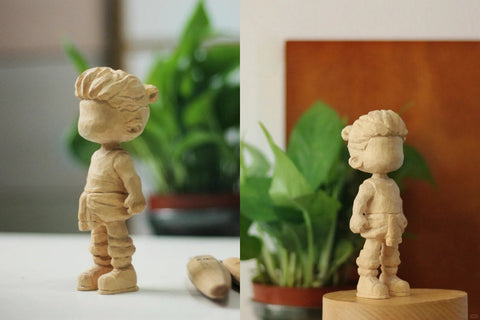
Study the hair as large masses. The painted figure is a separate reference showing the sloping sideburns and layered hairline. Compare where the hair meets the forehead, changes direction, and ends beside the ear; it is not a later stage of this carving.

Draw the sideburn boundary and reserve the upper hair. For a longer sideburn, the guide may extend below the base of the ear; a shorter one may end around its middle. Lower the adjacent face in small cuts to separate it from the hair, keeping room to adjust the final boundary.


Check the forehead, brow area, and bridge of the nose in profile. Reducing the forehead can make the bridge appear too shallow, so compare the adjoining face before changing the nose again. Narrow an overly wide nose gradually while keeping both sides of the face balanced.

In the inverted comparison, the nose remains in front of the lowered face. Preserve that projection rather than cutting the whole front of the head back by the same amount. Work in thin shavings so a small adjustment does not leave a deep scar.

The front-and-profile drawing shows the brow separating the different slopes of the forehead and nose. Use those relationships to judge depth, then simplify them to suit this small head. The carving uses a projecting nose and broad face planes; detailed eyes or lips would require additional practice and a different level of refinement.

Build the side part with broad hair masses
This hairstyle has a part to one side of the facial centerline. Mark the part, then establish the two main hair masses before adding smaller edges. The masses need not be mirror images: the reference has a higher, fuller sweep on one side.


Lower the smaller mass gradually and leave the larger mass proud of it. Work with broad changes in level rather than a row of fine grooves. The difference in height should explain the direction of the hair even before any small detail is added.

Check the lower hairline from the front and profile. If the sideburn occupies too much space in front of the ear, narrow that reserved strip. This changes the apparent ear position by removing surplus wood at the boundary; it does not move the ear itself.


Remark the part and sideburn edges as their surfaces change. Keep the paired ear positions balanced while allowing the hair above them to remain asymmetric.

Turn the figure upside down or on its side when that gives a clearer approach to a short edge. Remove small shavings, stop before cutting into the reserved ear, and check the face again before deepening the hair boundary.

Round the crown and refine the ears and jaw
Compare the carved hair with the reference once more. The lower side of the part should remain lower, while the fuller side keeps its top volume. Thin the sideburns selectively rather than reducing the entire hairstyle.

Round the crown into the back of the head with small, connected reductions. Keep turning the work so a smooth front view does not hide a flat corner behind the ear.

Refine the jaw and lower face beneath the nose. If the face looks too broad and long beside the small nose, narrow its side corners a little and compare it again. Soften the remaining block corners while preserving the simplified shape. The nose still needs enough surrounding wood to join the forehead and lower face cleanly.

The ears in this example are small and tapered, with more width at the top than at the bottom. The ear size on this small carving is roughly 5 mm. Use the head size and reference to choose the proportion for another figure, and avoid cutting an arbitrary measurement into it.


Check the ear against the sideburn and back of the head before making the last small reduction. Once the head reads clearly from the front and profile, compare it with the shoulder and torso width. The body remains rough at this point and can still be adjusted. Check the grain through the ear and sideburn before making those small cuts.

Before returning to the body, check the head from every side. The nose should still project from the face, the ears should sit beneath the hair, and the crown should connect smoothly to the back of the head. The two sides of the hairstyle can differ without the whole head leaning unintentionally. Keep the remaining body material until you can compare its width with the head.