Carve a Wooden Boy with Swept-Up Hair
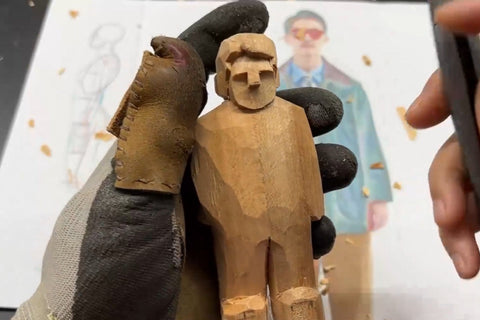
This small figure has swept-up hair, a simple face, and clearly defined clothing and boots. Its main lesson is to keep several views moving forward together. If the front is refined while the side remains too thick or the back too flat, small details will not bring the body back into proportion.
The stages below turn a marked blank into broad masses, then smaller planes, and finally hair and clothing details. Use the photographs as checkpoints for the visible forms. They are most useful when you already have basic knife control and can compare a drawing with a three-dimensional blank.
Restore the front and side outlines after cutting
Draw the broad silhouette before removing the surplus. Keep the main head and hair volume, body, arms, legs, and feet visible in the plan. The first photograph shows the front and side guides on a blank that has already been roughly cut.

Use a saw suited to the job with the blank properly supported or clamped. Compare the two views before cutting near a narrow connection, and leave a margin outside the final contour.
Restore any outline removed by the cut. Carry the important levels across adjacent faces so the head and body occupy the same positions in each view. At this stage, a clear silhouette is more useful than a dense drawing of every clothing fold.
Before switching to finer shaping, turn the blank through front, side, and back views. Check that it still contains the intended hair volume and that both arms and legs have enough material for their final forms.
Keep the most prominent parts while removing the block corners
Use a suitable carving knife with controlled cuts to establish the larger rise and fall of the head, torso, arms, and legs. Compare the front and profile as you go; reducing a surface in one view also changes the neighboring view.

Before rounding a block form, mark the part that should remain most prominent from that view. This is the surface projecting toward you, not necessarily the topmost point of the figure. Keep that volume while removing the corners around it.
The early progress views still show large flat planes and generous feet. Round only the corners that are surplus to the intended shape. Do not turn every part into a cylinder: the torso, hands, hair, and boots each need their own silhouette.

Pause after a few reductions and compare the head with the shoulder width and body depth. Check the legs beneath the torso. If one area is advancing much faster than the rest, return to the larger unfinished masses before adding detail.
Refine smaller planes without losing the whole figure
Once the larger forms are clear, divide them into smaller surfaces. Refine the shoulder-to-arm transition, the front and side of the torso, and the separate leg and boot masses while continuing to turn the carving.
Keep a short comparison cycle: inspect the front, turn to the profile, then inspect the back before returning to the same area. The goal is not identical shapes on all sides. It is one coherent body with the depth and pose you intended.
The middle progress photographs show the head and clothing becoming clearer while other parts remain rough. Use those rough areas as material you can still adjust, rather than rushing to finish one boot or one lock of hair.

Check the rear head volume and the shoulders from the back. A rounded face does not guarantee that the back of the head is resolved. Keep the hair reserve intact until you can see how its front, top, and back masses connect.

Give the hair a clear direction before adding fine divisions
The hair carries much of this figure’s character. Establish the broad upward and backward sweep first, then separate it into a few larger locks. Keep their heights and direction related so they form one hairstyle rather than a row of unrelated cuts. Read the grain through the hair locks before thinning their points.

Compare the hairline with the forehead and side of the head. Refine the neighboring surface only enough to make the boundary readable. Retain the upper hair volume you reserved during rough shaping.

On the clothes, use a few folds to explain the waist, sleeve, and leg transitions. The boots remain distinct from the lower legs, and the hands remain small forms beside the body. Avoid cutting every drawn mark equally deep.
Finally, compare the detailed front with the side and back again. The final photographs show an unpainted figure with a deliberately simple face. You can add a painted expression later if it suits the design; the example here ends with the carved wood.

Stop when the pose, hair direction, and clothing boundaries read from several angles. Further detail is worthwhile only if it clarifies one of those forms. The same habit—preserving the important volume, removing the surrounding surplus, and checking the neighboring views—can be used on a different small character.