Carving a Dragon Head for a Costume Figurine
The dragon head is the main feature of this small costume figure, with the child’s face set beneath it and a simple body below. It is a detailed project for carvers comfortable with shaping figures. The most useful part of the process is redrawing the head decoration after the rough cuts have removed the first sketch.
Materials and layout
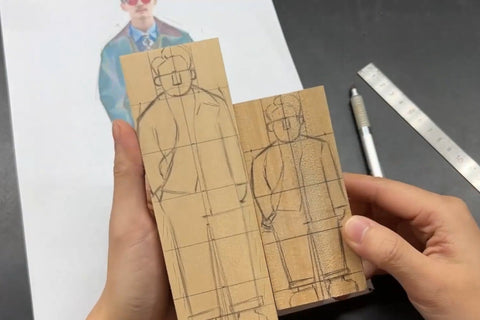
This project uses a rectangular basswood block, a saw, carving tools, sandpaper, a pencil, and a ruler. Draw the front, side, and back views before cutting.
Use horizontal guides wherever a feature needs to stay at the same height around the block. This design uses 12 such lines. Extend them around the faces, then draw the head, face opening, clothing, and body against those references. Work in pencil while you adjust the proportions.

Establish the rough figure
Saw away the larger waste sections, then refine the cutout with a carving tool. This example leaves approximately 1–2 mm outside the outline at this stage. That allowance belongs to this project; keep additional material wherever your design still needs shaping.
Work from one view, then restore the drawing on a surface that has been cut away. Compare the front and side frequently so the head and body remain in the same relationship.
Secure the blank for the saw cuts; the carving tools guide covers saw choice and workholding.


Round the body and restore the head drawing
Refine the broad planes before adding small decoration. The body and clothing below the dragon head are simpler shapes; keep their separation visible while rounding the edges.
The rough cuts will have removed parts of the first head sketch. Draw the head decoration again on the new surfaces. Use clear marks to distinguish wood you intend to keep from areas you intend to recess. This project uses heavy and light lines for this distinction.


Carve the dragon-head detail
Follow the redrawn shapes to establish the head’s projecting and recessed details. Check the face opening below the dragon head as well as the outer profile. The side view is particularly useful for seeing how far the head projects over the small body.
Use smaller tools for the narrow details and clothing folds. Refine a little at a time, returning to the drawing whenever a contour becomes unclear.
Before working in these narrow areas, review hand position and blade-path safety.


Refine the surface
When the shapes are established, sand the areas that need smoothing, progressing to a finer abrasive as appropriate. Preserve the small changes in depth instead of sanding the head decoration flat.
The photographed figure is unpainted. You can keep that appearance or choose a painted finish. The project’s complexity lies in the head decoration and repeated drawing, so allow time for those stages rather than treating it as a quick first carving.