Wood Carving Tools for Beginners: What You Need and How to Choose
A small figurine does not need a workshop full of equipment. Start with a carving knife suited to the project, a manageable wood blank, hand protection, and a way to maintain the edge. Add a saw and a secure vise when you need to cut a larger block down to size.
This guide to wood carving tools for beginners focuses on small figures and similar hand-carved projects. It explains what each tool contributes, how to match a vise and saw to the wood, and how to saw a squirrel outline while leaving room for the carving that follows.
Start with the tools for your first project
Choose a simple project before choosing a large tool set. A small figure cut from a ready-sized blank may need only a few basic wood carving tools. Starting with a thick board adds another job: holding it securely and removing the excess with a saw.

Use the tool names and purposes below to separate what you need now from what a later project might require.
| Tool or material | What it does | When to get it |
|---|---|---|
| Carving knife | Shapes the outside of a small figure with controlled cuts. | Start here for a simple whittled figure. Choose a blade and handle you can control. |
| Wood blank | Provides enough material for the shape and its finishing allowance. | Start with a manageable piece; a prepared blank can reduce the sawing needed. |
| Hand protection | Helps protect the holding hand during hand carving. | Use suitable cut-resistant protection and safe hand placement. Gloves are not cut-proof. |
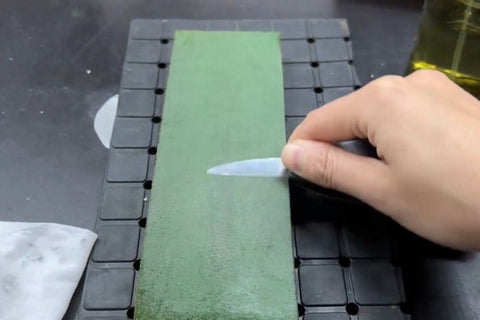
| Strop | Helps maintain an already sound, sharp edge. | Include it early, with a stropping method suited to the blade. |
| Vise or suitable clamp | Holds stock steady for sawing or supported carving. | Add it when the operation needs fixed workholding. |
| Hand saw | Removes larger waste before knife work. | Choose a straight-cutting saw for sizing stock; add a suitable frame saw when curves require it. |
| Detail knife, gouge, or V-tool | Makes a particular detail, hollow, or groove. | Add one when the design gives it a clear job. |
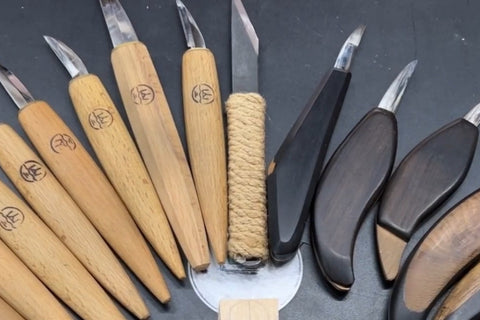
A detail knife has a small blade for tighter work. A gouge has a curved cutting edge for scooping or shaping hollows; a V-tool cuts an angled groove. A straight-edged carving chisel serves different cuts again. The tool's profile, size, and handle matter more than how many pieces are in the box.
Small palm tools are intended for controlled hand pressure. Larger work may call for tools designed for mallet use and a different holding setup. Check the tool maker's intended use; Flexcut's tool-selection guidance explains the relationship between project size and tool type. You do not need every category for a small figure.
The kit photo also includes a utility knife. Treat that as a task-specific tool, not an automatic substitute for a carving knife: the blade, locking mechanism, and intended use must suit the cut. For your main knife, see our guide to choosing a whittling knife.
Buy individual tools or a starter kit?
For a first small figurine, buying a few suitable tools individually is a practical choice: put the budget toward a controllable knife, usable wood, protection, and edge maintenance. Add rough-cutting tools only if your blank needs them.
A wood carving starter kit can also work when its contents match the project. Before buying, check whether it includes the knife or profiles you will actually use, whether the wood is a workable size, and whether protection and maintenance supplies are included or must be bought separately. A set of several similar knives may still leave you needing a strop or a way to hold the wood.
Choose a set for the useful tools it contains, rather than its piece count. For a relief carving or a hollowed form, revisit the list: a knife-centered kit for figures may not provide the gouges and workholding that project needs.
Choose a manageable wood blank
Our carvers often use basswood for small figures. Its fine, relatively even texture is useful for shaping details and preparing a surface for paint. A modest-sized basswood blank is a practical starting point for the projects shown here. Our guide to whittling wood compares species and explains how to inspect a block.
Balsa is another soft option, but softer does not always mean easier. It dents readily, and a dull blade can crush the fibers instead of cutting them cleanly. Walnut, cherry, birch, and maple are also used for carving, but their working feel differs; do not assume a tool setup that feels easy in basswood will require the same effort in another wood.
Choose a blank that leaves room for the design without making you remove an unnecessarily large amount of wood. The sawing example below separates the initial rough allowance from the smaller margin kept around the final outline.
Fit the vise to the bench and the blank
A vise must do two jobs: attach securely to the work surface and grip the wood. Check those dimensions separately before buying. A compact vise can suit a small blank, but the smallest available model is not automatically adequate.


Check the mounting clearance
Measure the bench where the clamp will sit, including anything underneath that reduces access. Compare that measurement with the vise's stated mounting capacity. The clamp needs a sound surface to bear against; a decorative edge or obstructed underside may prevent a secure fit.


Check the jaws and protect the wood
Measure the part of the blank you intend to grip and allow for any jaw pads. Jaw opening determines whether the piece fits; jaw width and the way the piece is supported also affect the setup. Hold the work close to the jaws where practical, leaving the intended cut and the saw's travel clear.


Soft basswood can pick up clamp marks. Leather pads, as used here, provide a buffer between the wood and the jaws. They do not replace secure clamping: check that the piece cannot shift, without overtightening and crushing it.


A wider vise may be useful for larger stock, provided it fits the bench and supports the intended operation. Buy for the blanks you expect to hold, rather than choosing by size alone.

For installation and use, follow the vise manufacturer's instructions and the CCOHS vise safety guidance. Secure the base, keep the cut clear of the jaws, and do not use a handle extension to force the clamp tighter.
Choose how the carving will be held
Wood carving vises vary in both how they attach to the work and how they let you reposition it. The padded jaws shown here grip the outside of a blank. Some adjustable carving supports use a plate screwed to the work and let you tilt or rotate it for access; the Veritas carving-vise instructions show this arrangement.
For the squirrel blank below, secure jaw contact and saw clearance are the immediate needs. Consider a screw-mounted support when changing the carving angle would help and the piece has a substantial attachment area where holes are acceptable. Check the plate size, screw penetration, and bench-mounting method for that system, keeping fasteners clear of planned cuts. Jaw opening alone cannot answer those questions.
Choose a saw for straight cuts and curves
Choose the saw for the cut you need to make. Reducing a board to a smaller block calls for a different blade from following a tight outline. Tooth pattern, blade depth, stock thickness, and available clearance all matter; fine teeth alone do not guarantee a faster cut.

Straight-cutting hand saws
A backsaw has a reinforced spine that helps stiffen the blade. That reinforcement also limits cutting depth: once the back reaches the wood, the cut cannot go deeper in that position.

An unbacked saw avoids that particular obstruction. It still has limits: blade length, tooth pattern, wood thickness, and room to make the stroke must suit the task. It is not a promise that the saw can cut stock of any thickness.

A thin, flexible flush-cut saw has a more specialized job, such as trimming a projecting dowel or plug close to a surface. It is not our first choice for roughing out a thick carving blank.

Narrow blades for curved outlines
Hand frame saws hold a narrow blade under tension. Coping saws and finer fret-style saws belong to this general family, but their blades and fittings are not interchangeable by default. Check the frame's blade requirements and choose a wood-cutting blade suited to the thickness and curve.


Fit the blade and make a first cut: Use this sequence with the fittings and tension control on your own hand saw.
- Seat and align the blade. Release the tension before fitting a blade. On a pinned-blade coping saw, seat both end pins fully in their holders. On a pinless fret-style frame, insert and clamp both bare ends to the depth specified for its clamps. Align both holders so the blade is not twisted. Confirm the cutting direction: on a pull-cut setup such as the Eclipse coping saw, the teeth face the handle.
- Tension with the correct control. Some coping saws tighten by turning the handle; others use a cam lever and a separate adjuster. Follow the sequence for that mechanism, as illustrated in the Knew Concepts coping-saw and fret-saw manuals. On these Knew Concepts frames, make tension adjustments with the lever released, then close it. If closing becomes difficult, release the lever and reduce the tension setting. Before cutting, check that the blade sits straight and taut and both ends stay seated.
- Start gently on scrap. Clamp a similar piece of wood with the cut clear of the jaws and frame. Start on the waste side of the line with short, light strokes until a groove guides the blade. Apply light pressure on the specified cutting stroke and ease it on the return. Lengthen the strokes as the cut settles, keeping the blade aligned; stop if it bows, binds, or pulls loose.
A very fine blade can be a poor match for a thick blank. In this example, the concern is keeping the cut aligned through the wood, not merely following a line on its upper face.


If a cut starts leaning, stop and inspect the setup. Check the blade's suitability, condition, installation, and tension according to the saw's instructions, and check how the blank is held. Pushing harder or sawing faster is not a reliable correction. Leaving extra wood gives you room to recover; crossing the finished outline does not.
The Knew Concepts frame-saw guide explains blade and frame considerations. For general hand-saw precautions, see CCOHS hand-saw guidance; also follow your saw's specified push or pull cutting action.
When power tools make sense
Power saws become worth considering when you have enough repeated rough-cutting work, budget, and suitable workspace. They are optional for the small hand-carved projects discussed here. Buying a machine also means learning its setup and safe operation.

Band saw or scroll saw?
A band saw uses a continuous blade that travels downward through the table at the cutting point. With a suitable blade and setup, it can remove larger waste and cut curves within that blade's limits. This is why it can be useful for preparing repeated carving blanks.


A scroll saw uses a narrow blade with a reciprocating motion and can suit detailed outlines. The work must stay supported on the table; unsuitable feed, blade selection, or setup can let the stock lift or chatter. Adjust the hold-down as directed by the machine's manual and let the blade cut without forcing the wood. Thickness capacity depends on the machine, blade, and material.

Neither machine is automatically the easier or safer choice for every beginner. The CCOHS band-saw precautions and your own machine's manual should guide setup, guarding, work support, and stopping procedures. The WEN scroll-saw manual provides a model-specific example of blade selection and work support; use the instructions for the machine you actually own.


Plan the workspace before buying
Allow for a stable bench, working clearance, dust collection, noise, and vibration. Arrange dust control before starting, and choose a location and working hours that suit the people around you. Any vibration-control accessory must be compatible with the machine's mounting instructions.
Wear the eye protection and other protection specified for the operation, keep loose clothing and hair clear, and do not transfer hand-carving glove advice to moving machinery. Stop the machine and follow its isolation instructions before changing blades, making adjustments, or clearing trapped waste. For hand-held knife work, our wood carving safety guide explains hand protection and blade clearance.
Saw a small carving outline with room to refine it
The squirrel example below shows how the tool choices work together. A straight hand saw sizes the stock; a suitable narrow-bladed hand frame saw handles curved sections. The clips illustrate layout, allowances, clamping, and the results of separate cuts. They are not a continuous demonstration of every saw stroke.
1. Place the pattern and separate a rough blank
Attach your paper outline to the wood so it stays in place during layout. Check that the complete shape fits with waste around it, and check the grain direction before committing to the layout. For the initial rough separation shown here, leave about 1 cm outside the outline rather than trying to follow the silhouette closely.


2. Plan the thickness and secure the work
Check the thickness before cutting the close outline. In this example, the stock is about 5 cm thick and the intended figure about 3 cm thick, leaving roughly 2 cm of excess. Mark the portion to keep, then allow for the saw kerf and later shaping; cutting exactly to the desired finished thickness would leave no correction margin.

Use a straight-cutting saw suited to the stock for this reduction. A thinner blank can be more manageable for the later curved cuts, but it must still contain the full planned figure and its shaping allowance.

Mount the vise securely before sawing, grip the blank firmly, and check the entire blade path. Stop sawing before loosening or repositioning the work. These clips show the gripping relationship; the first is a loose-vise demonstration, not a complete mounted sawing setup.


3. Mark a closer allowance around the outline
Now mark the line for the closer outline cut. In this small example, about 1–2 mm outside the paper silhouette provides a margin for later knife work. This is a different stage from the earlier 1 cm rough allowance, and it is not a universal margin for every wood, saw, or design.


Leave more wood around small, vulnerable details such as the feet. If you expect the blade to wander, keep a larger margin or choose a more manageable setup. The goal is a sound blank you can refine, not the closest possible saw cut.

4. Divide tight curves into separate cuts
A narrow blade can follow curves, but it cannot turn through any angle in one stroke. Look for abrupt changes of direction before starting. Divide those areas into sections that the saw can reach without twisting or forcing the blade.


Make access or relief cuts from the outer edge through the waste at the section boundaries. Stop them on the waste side of the finished outline. Then follow one curved section at a time until it meets an opening and releases that piece of waste.

Stop the saw before handling the waste. Lift away only a section that has been fully separated. If it remains attached, finish the connecting cut instead of snapping it off and risking a split into the figure.


Continue in manageable sections, preserving the allowance around the shape. Once the rough profile is free, inspect both faces and the edges before moving on to carving.
If the cut is not going as planned
| What you notice | What to check before continuing |
|---|---|
| The cut leans through the blank | Stop. Check blade suitability and tension, the holding setup, and alignment on both faces. Preserve extra wood instead of pushing toward the final line. |
| The blade binds at a tight turn | Do not twist it harder. Check whether that curve needs a relief cut, a different approach, or a more suitable blade. |
| The blank moves in the vise | Stop and check the base mounting, jaw contact, pads, and gripping position before restarting. |
| The jaws mark the wood | Check pad coverage and clamping pressure. The blank must stay secure without being crushed. |
| A waste section will not come away | Look for an uncut connection. Complete the cut rather than breaking the section off. |
Keep the tools ready for the next session
Clear chips from the work area, keep tools dry, and protect cutting edges when storing or carrying them. A fitted case or holder can keep edges from striking other tools; keep sharp tools out of children's reach. Flexcut's storage guidance also stresses dry storage and protection from humidity.
A strop helps with routine edge maintenance, but it does not make every damaged or blunt edge ready to carve. Follow our guide to sharpening a whittling knife for the distinction between sharpening and stropping.
With a secure setup and a prepared blank, the next task is controlled shaping. Practice the basic whittling cuts before working into the squirrel's small details, and add another tool only when the design gives it a useful job.