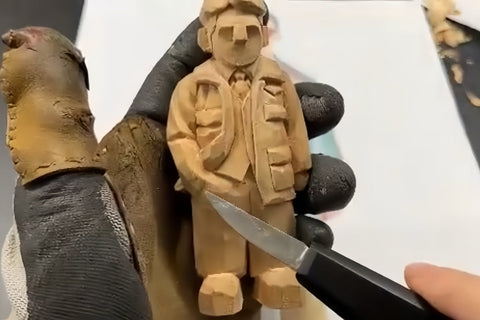
Carve a Wooden Couple: A Dress-and-Suit Project
A pair of figures must work as two individual carvings and as one arrangement. In this example, a dress and a suit create different silhouettes, while the scale, stance, and final dark clothing tie the pair together. The simplified faces are completed with painted features.
This is an advanced worked example of layout, shaping, and finishing decisions. The progress photographs show important changes in the forms, but they do not provide a measured pattern or a cut-by-cut sequence for every detail. The comparisons are intended for carvers who can already work from several views and control small cuts.
Plan the two figures together
Draw the pair at the intended relative scale before separating the smaller forms. In the front drawing, compare the head sizes, shoulder levels, body lengths, and the space between the figures. The outlines need to look balanced as a pair, even though the outfits differ.

Check the profile drawings separately. The skirt, chest, back, jacket, and shoes occupy different amounts of depth. Match the side outline to the front view instead of using one body profile for both people.

The drawings and rough-stage photographs retain material beneath the figures. Keep the support needed for your own layout while shaping the narrow areas. The finished pair is displayed on a round stand. This guide covers the carving and painted finish; it does not include a mounting method for that stand.
Before sawing, locate the transitions that need extra care: the neck below each head, the waist or clothing junction, and the connection above the feet. Mark the waste around those areas rather than treating a horizontal guide as a line to cut through the figure.
Use the front and side views to control the initial cuts
The first kerfs divide the surplus around major body transitions. In this design, the dress figure narrows at a different height from the suited figure. That comes from these poses and outfits, not a rule that every woman or man needs the same outline.

Check the depth of each kerf from the front and side before removing waste. A cut that appears safe in the front drawing may reach too far into the profile. Preserve the neck, torso, and other connections as continuous wood.

With the work secured, remove the marked surplus in controlled stages. A tool used for mallet-assisted removal must be designed for that purpose. Keep a margin around the final contour and inspect the grain and newly exposed surface as you proceed.
The rough pair should now show separate head and body masses while retaining room for the clothing. Check the space between the figures as well as their outside silhouettes. Their relationship matters as much as either outline alone.


Round the larger forms while keeping the outfits distinct
Reduce the corners of the head and body masses gradually. Compare the two heads, then turn the work to examine each profile. Preserve enough depth at the back of the heads while rounding the front.

On the dress, keep the intended change from upper body to waist and skirt. On the suit, retain the broader jacket shape and the division above the pants. Rounding these surfaces should not erase the difference between the two outfits.

Look from the side to judge the chest, back, and clothing depth. Lower a surface only after deciding which neighboring mass must remain proud of it. This prevents a waist or neck from becoming too narrow during a series of unrelated reductions.
The checkpoint is a pair that reads without small grooves or painted faces: recognizable head and body proportions, different clothing silhouettes, and a stable arrangement of the two people.
Refine collars, garment openings, and skirt folds
Use a smaller blade where it improves control around the collar and clothing edges. Identify the raised layer first, then reduce the adjoining surplus a little at a time. A clear overlap is more useful than a deep groove of uniform width.

On the skirt, use the larger shape to guide the direction of the folds. Keep enough wood at the ridges so the skirt remains a continuous form. On the suit, compare the collar, garment opening, and trouser boundary before deepening their edges.

Inspect the same detail from the front and side. The photographs show the clothes becoming more specific while the faces remain simple. Fine clothing marks should support the silhouettes already established.


Check the two figures together again. Differences in detail density can make one outfit dominate the pair, so stop adding lines once both characters are clear at the scale of the whole arrangement.
Prepare the surface and plan the painted features
This pair uses smoother faces with painted expressions. Smooth the broad facial surfaces as needed while preserving the head shape, hair boundary, and neck connection. Sanding should refine the chosen form, not replace unresolved carving.
Brush away loose material and sanding dust, including any caught in the clothing grooves. Check that the small edges you want to keep have not been rounded away.
For this pair, water-based color was sprayed over the broad areas and the facial features were painted by hand. The progress views show dark hair over otherwise light surfaces before the final black outfits. Plan the broad color areas first, then work on the small face details.


Test the paint and any clear coat as a compatible system on matching scrap, following the products’ preparation and drying instructions. The face details can then be placed on a clear, settled surface.
Use differences within the dark clothing to keep the pair readable
The finished views show dark formal outfits with lighter skin, collars, and small accents. Compare those contrasts before painting the finest lines so the face and clothing remain distinguishable when the pair is viewed together.

The two close views are useful checks: the dress neckline separates from the shoulders, while the suit collar and glasses help identify the other figure. Keep details proportional to the face rather than enlarging them to compensate for an unclear base shape.

Natural wood color could support a different artistic treatment. Here, the dark finish is a choice made for this pair. It is not a requirement for an advanced carving or a guarantee of a more realistic likeness.
Inspect the completed color arrangement from the front and three-quarter views. A small difference in dark tone or a readable raised clothing edge can provide separation without outlining every fold in a contrasting color.


For another pair, begin again with the relationship between the two people: relative scale, pose, clothing depth, and the space between them. Keep checking that relationship as the individual forms become more detailed. That is the most useful part of this example to carry into a new design.
Prefer a custom pair made for you? Explore our custom wooden couple figurines and contact us with your reference photos to discuss the design and get a quote.