Carve a Wooden Figure from a Photo
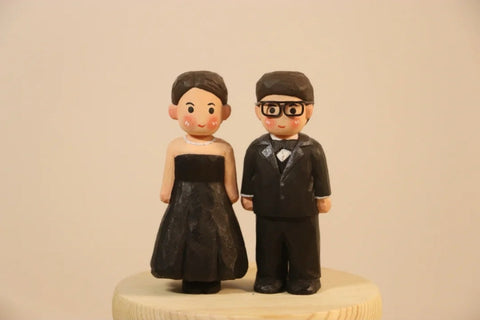
A photo can give a small carved figure its identity through a hairstyle, an outfit, a bag, or a familiar stance. This example uses a long-haired figure with a collared outfit and a shoulder bag. The face stays simple, so the character depends mainly on the silhouette and clothing relationships.
The sequence is a worked example for someone with basic carving skills. It shows how to turn a photo-based drawing into block forms and then refine what is visible in the carving. Keep the reference nearby and leave room to revise the profile and clothing as the figure develops.
Choose what to keep from the photograph
Start with a clear full-body photograph so you can see the stance, the shape of the clothing, and where accessories sit. Select the features that will still read at the size of the carving. In this example, the long hair, collar, and bag do more to identify the design than tiny facial features would.
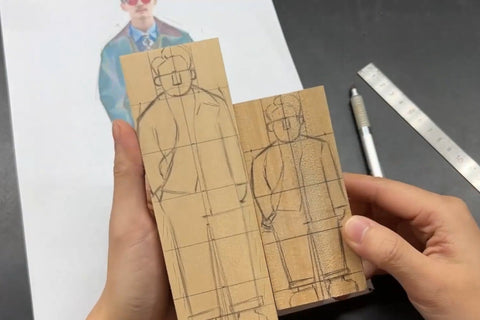
Draw a front and side view on paper, then fit the design to a rectangular basswood blank. Use the same foot baseline and corresponding head, shoulder, and clothing levels on both views. Leave enough depth for the hair behind the head and for the bag beside the body.

If the photo does not show the side, find another view or study the person’s pose and clothing. Distinguish a confirmed feature from a shape you are simplifying. Keep uncertain profile areas broad until you can compare them on the rough carving.
Before cutting, look at both outlines together. The drawings should describe one figure with the same height and pose, not two separate attractive sketches. Keep the original reference after transferring the lines, because some of them will disappear with the waste.
Cut outside the outline and redraw the lost view
This example begins from the side outline. Secure the blank, check the cut against the front view, and remove only the marked surplus outside the intended figure. Leave a margin so the hair, torso, and accessories can still be adjusted.
When cutting removes part of the front drawing, restore that view on the new surface. Then use the front outline to guide the next reduction and redraw the side where necessary. The first drawing was still useful: it established the overall relationships before any wood was removed.
Check that the bag and the arm beside it still have material. A silhouette cut can remove more from a projecting accessory than the front view makes obvious. Keep returning to the two views while the forms are easy to revise.
Stop rough cutting when the principal head and body outline is clear. The narrow transitions and clothing folds can wait until you can see the three-dimensional form.
Organize the figure as connected block forms
Think of the head, torso, arms, and legs as connected block forms. Keep their boundaries broad while checking where each form sits in relation to the others. At this stage, the carving can look stiff without being wrong.
The progress photographs show the clothing and bag beginning to emerge while the legs and lower body remain angular. Use that combination to your advantage: broad surfaces make it easier to compare lengths and overlaps than a collection of small finished details would.

Compare the head with the shoulder width, and check the body depth from the side. Look for the bag’s volume beside the torso and for the arm that lies near it. If a relationship is unclear, redraw its edge before reducing the surrounding wood.
Once the large forms agree with the intended pose, begin softening their corners. Keep a clear distinction between rounding a surface and making the entire part smaller.
Round the hair and body while preserving the clothing edges
Work around the head and hair with small reductions that connect neighboring planes. The long hair has a visible outer silhouette and hangs behind the upper body; do not narrow the whole head merely to make the front look round.
On the outfit, decide which surfaces overlap before carving a fold. The collar sits in front of the upper garment, and the bag and its strap need to remain distinguishable from the body. Lower the adjoining surplus selectively rather than cutting every line to the same depth.
Use the close views to check the bag opening and flap, the collar, and the sleeve transitions. These are visible shape relationships you can compare on your own carving. There is no need to invent additional grooves wherever a surface looks plain.

Turn the figure to inspect the same area from the side. A strong front outline can conceal a flattened bag or an overly thin sleeve. Keep the larger body relationships intact as the edges become clearer. Check the grain through the hair, sleeves, and bag before thinning those connections.
Use four views to decide what still needs refinement
Switch to a smaller blade where it gives better access to a short edge. Remove thin shavings and inspect their effect before repeating the cut. The useful question is specific: does the collar separate from the chest, does the bag project as intended, or does the hair still connect to the back of the head?
From the front, compare the two legs, the garment opening, and the position of the head over the body. From the side, check the hair depth, the arm beside the bag, and the shoe projection.

From the back, follow the long hair and the strap across the clothing. Check whether an edge continues naturally or disappears beneath another form. Preserve those overlaps rather than forcing every line to stay visible around the whole figure.
The four-view photograph is the final check for this unpainted example. Its quiet face is part of the design; the clothing and hair carry most of the detail. Stop when those forms read clearly instead of adding features that change the intended style.

Choose a surface treatment after the carving is resolved
The photographs show the figure in its natural wood color. You can keep that color with a suitable clear protective finish, or choose paint. Make the choice after the hair, clothing, and bag are fully shaped.
Finish the carving and remove loose fibers and dust before applying a coating. Test the chosen product on matching scrap and follow its preparation, drying, and handling instructions. If you decide to paint, check that the colors preserve the hair, bag, and clothing relationships you have carved.

For another photo-based figure, repeat the same process with the features that matter to that person: establish the silhouette, check the profile, keep the large masses coherent, and refine a few recognizable details. The aim is a considered small interpretation of the reference, not a promise of a photographic likeness from a single view.