How to Carve Ears for Realistic Wooden Gifts
Hey everyone, this is Wooden Smile. In the last post, we started carving the head and face of our little wooden figure. This time, we’re going to dive into how to carve the ears in detail. Don’t underestimate how much ears can help bring out the three-dimensional feel of a character—that’s why we’re dedicating a whole step to it, to help woodcarving beginners create more lifelike wooden gifts.
First, we’re going to slightly refine the shape of the figure’s face, making it look as round as possible. You’ll notice that the lines we drew earlier are still on the wood—that’s on purpose. We’re leaving some extra space to give ourselves a bit more wiggle room while carving. And if we find later that there isn’t enough space for the hair, we can always borrow a bit from below.

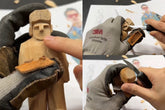
We’ve already carved the height difference between the nose and the face, so now let’s find the position of the ears. We’ve mentioned in earlier wooden gift tutorials that the ears usually line up with the brow bone and the bottom of the nose on the side of the face—remember that? So now, we can draw extended lines from those two reference points along the side of the head, and that gives us the correct ear placement. The ears go roughly in the area we’ve marked. Do the same for the other side. When sketching the second ear, make sure they’re symmetrical—look down from the top of the figure’s head to check that both ears are lined up.

Now, cut along the lines we drew to carve out the ear shapes. All in all, the process of carving a small wooden figure is really just about finding coordinates, identifying reference points, then slicing across the grain—either horizontally or vertically—and shaping those cuts into curves. That’s really all there is to it.

Same goes for the bottom of the ears—don’t rush to carve them deeply just yet. First, leave enough space for the shape of the face and shave away anything that doesn’t belong. Now let’s take a look from the front—there you go, both ears are carved out nice and easy. Just clean up the contour of the face, adjust both sides to make sure they’re even, and now our little wooden figure is really starting to come to life, right?

After carving the ears, we need to angle the nose slightly—you’ll see the nose slopes from top to bottom, which is how it typically looks on a real person. But while shaving down the nose, we also need to leave enough room for the hair. So don’t just cut without thinking—we still need to do some spatial planning. And that’s what we’ll cover in the next post: how to carve lively, expressive hair for your wooden gift.


