Wooden Gifts: How to Carve and Refine Realistic Hairstyles
Hey everyone, this is Wooden Smile. We’re back to share more tips on carving wooden gifts. In this post, we’re focusing on refining the hair of the figure.
Once we’ve established the basic relationship between the face, nose, and forehead, we can start cleaning up the hairstyle and rounding off those blocky edges. No matter what kind of hairstyle your figure has, the hair never just falls straight down from the side view, and the top of the head is never perfectly flat.

After roughly rounding out the top of the head, take a look at the hairline. This figure has a side part, just a little to the left of the center of the nose. We’ll use a ballpoint pen to sketch that on the wooden figure—it’s a diagonal part.

The left side of the hair is smaller, so we’ll draw a line going downward and sketch in the sideburn at the end. Try to make the left and right lines as symmetrical as possible. Even if the reference photo isn’t perfectly symmetrical, our wooden gift should be, since it’s an artistic interpretation. Some asymmetry is totally normal on a real human face, but if an artistic carving isn’t symmetrical, it can look a bit off.

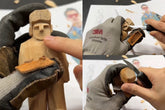
Start by finding the angle of the part line and cutting it out with your carving knife. Follow the contour line you just drew and remove the excess wood.

Use the same carving technique on both sides of the hair. From the side view, carve the hair in steps, like stair-steps.

At this point, we noticed the ear is sitting a bit too far forward, so we’ll shift it back a little. It’s a good time to make adjustments—like narrowing the sideburns if they look too wide.

In the reference photo, you’ll see the hairline isn’t a flat line—it slopes downward slightly. Right now the hair is still a bit thick, so let’s move the hairline up a bit. We’ll re-carve the split area of the hairline and cut a little deeper, which lets us shift the entire hairline upward.

If you can’t find the perfect spot in one go, no worries—just do it in stages. No need to rush. While we’re adjusting the hairstyle, we can also touch up the face shape. Let’s pause and take a look—one side of the face is a little bigger than the other, right? That’s something we can continue tweaking as we go.
Carving a wooden gift is all about constant adjusting and refining. It’s not about strictly sticking to the original lines you drew. You’ve got to observe and tweak as you carve—that’s how your figure starts to come to life. That’s all for this post. In the next one, we’ll continue working on the details of the hairstyle.


