How to Start Carving the Outline of Wooden Gifts
Hey everyone, this is Wooden Smile. In this blog, we’re going to walk you through how to carve out the outline of a wooden gift step by step. By the end, you’ll have a deeper understanding of the carving sequence and how to grasp the overall structure.
Before we actually start carving, you might have a quick question. In other tutorials or videos, you might’ve seen that some carvers trim off the excess wood from the front of the block first, then move on to shave the sides. If you already have a clear idea of how the front and side of your figure should look, you can totally do it that way. For example, if you’ve got a finalized front view and side view, we’d actually recommend it. But for now, we’re kind of figuring things out as we carve, and we’re not taking off too much at this stage.

Let’s take a look at the side view of the figure. It started out as an 8-heads-tall figure, but we’ve adjusted it to be just over 5 heads tall. What we’ve got here is an 11 cm tall, 3 cm wide wooden block sketch.

You’ll notice the head is a little bigger, and the arms, leg length, and foot size have been adjusted. There’s not much that needs to be carved off, and we can easily shape these areas with a carving knife. Carving while experimenting like this also tends to give more accurate results.
We’re still in the rough shaping stage here, so there’s no need to overthink things. We just need to break the figure down into three parts: head, torso & legs, and feet.

There are a lot of other small details on a figure, like wrinkles in the clothes, a collar, a tie, pants, a shirt, and sometimes even a hat. Don’t worry about any of that yet. For now, all we need to do is separate the head, body, and feet.

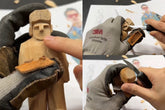
Alright, let’s get those gloves on and follow along with us. Don’t forget to strop your knife before starting—once your blade is sharp, carving will feel way more enjoyable.

When carving the outline of a wooden gift, our job is to shape the big chunks first, working from the general to the detailed. Just refer to the part separation diagram—we don’t need to worry about the character’s clothes, tie, or any fine details right now. Just focus on the big shapes and separate the head from the body. So the first cut we’ll make is around the neck area of the figure, about one millimeter below the jawline we just drew.

Remember those stop cuts we talked about in our earlier wooden gift carving tutorials? Make sure your stop cuts are clean—every slice should be neat and precise.
Now we keep carving inward. Don’t be afraid to shave off all the lines you just drew—we can always redraw them later. Be a little bolder in this step. Our wood block is still thick, so there’s plenty of room for us to continue carving. Once the front is done, we’ll do the same on the back. The goal is to clearly separate the head from the body.


