Carving Wooden Gifts: How to Recreate Poses and Arm Details from Photos
Hey everyone, this is Wooden Smile. In this tutorial, we’re going to show you how to perfectly recreate the pose and details of a person from a photo while carving a wooden gift. In the last post, we finished shaping the lower half of the wooden figure. Today, we’ll focus on carving the arms—especially since the person in the photo has their hands in their pockets. So how exactly do we do that? Let’s dive in and learn together!
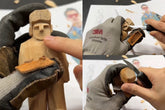
First, we’re going to smooth out all those sharp, angular edges and shave off any parts we’ve already identified as unnecessary.

Looking at the front, the right arm of the figure naturally hangs down in the original photo, so we can go ahead and carve it that way. But the left arm is different—it’s in a hands-in-pockets pose, so there’s a slight bend to it. If we imagine it with clothing, it would look something like what’s shown in the diagram. So we can trim away the excess part behind the guideline.

However, when we look back at the reference photo, we notice that the figure’s clothes are actually pinched under the arm, with a small corner sticking out behind it. So we’ll treat that spot as the corner of the arm and leave a little bit of material there—don’t carve it all away.

Next, we realize that the hand is slightly forward in position. In the photo, the person’s hand is in front of that little corner of the shirt. So we can carve the hand forward a bit, since it should look like the hand is slipping into the pocket.

Alright, now we spot another issue. One of the figure’s shoulders is slightly higher than the other, right? So we can shave down the higher shoulder a bit and adjust it so that both sides are as even as possible.

At this point, we’ve basically carved out both arms, and we’ve also recreated that little corner detail that shows up in a hands-in-pockets pose. Plus, we now have a nice vertical line there as well. Let’s take a moment to appreciate what we’ve done so far.

Once you’ve carved this far, it’s a good time to pause and reflect. Honestly, there aren’t really strict lines between each step when making wooden gifts. If you spot any extra wood or uneven spots while carving, just shave them down a little more.
Now the wooden figure in your hands should already look like a rough human shape. Technically, you could still make the body even thinner—but when you’re just starting out and not sure how much to carve away, it’s best to begin with the head. Once the head is defined, the shoulders naturally follow, and once the shoulders are in place, the rest of the body becomes easier to shape. That’s exactly why we always recommend beginners start by carving the head.


