Carving Hairlines and Facial Features for Wooden Gifts
Let’s take a look at the sideburns on this finished wooden figure. From the side, you can see there’s a slope to the sideburns, and the hairline has layers—it’s got a nice sense of depth. You can try looking at your own sideburns in the mirror, or find some photos of men’s or women’s hairstyles, and study the angle and placement carefully. No matter what kind of sideburns—whether it’s a side part or a buzz cut—hair always has a direction, and when we’re carving a wooden gift, the first thing we need to do is sketch out that direction.

The carving knife makes straight grooves, so we’ll start by drawing straight lines. If you want the hair to be a little longer, draw the line below the base of the ear. If you want it shorter, draw it around the middle of the ear.

Right now, if you look at the figure’s head from above, it’s still kind of blocky, but we know a real head is round. So let’s leave some space for the hair, and draw a rough guide. Start by hollowing out the forehead area.

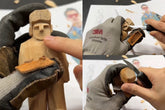
Pick a carving knife with a thinner blade and carve out the slanted line between the sideburn and the face. That creates a height difference. You’ll notice that the carved hairline is still a bit off from the guide we drew earlier—but that’s okay. We need to carve the forehead inward first, then shape the nose height, and from there we’ll get a better sense of where the final hairline should go and what kind of hairstyle the figure will end up with. Be careful not to carve too hard—shave off thin layers one at a time. If you go too deep, you might leave marks that are hard to fix later, and that’ll affect how the finished wooden gift looks.

By continuing to carve, the nose, forehead, and cheeks start to become more defined. While you’re at it, you can also clean up the face shape to make both sides more symmetrical. From the front, you might notice that the figure’s nose looks a little wide—go ahead and fine-tune the nose shape a bit.

Once we slope the forehead downward, we realize the bridge of the nose isn’t deep enough, so we need to carve the face in a little more.

When carving wooden gifts, there’s no strict rule about what part you should carve first or last. You just adjust as you go, based on the proportions of the figure’s face. Let’s take a close look at this real side-view photo of a person. You’ll see the slope of the nose and the slope of the forehead aren’t the same—there’s a brow bone in between that separates the two, kind of like a little hill.

The wooden figure we’re making here has a simplified facial style—its only major depth differences are the nose and the face. If you want to go for a more realistic look in your wooden gifts, we suggest practicing realistic head and face carving first. When you’re practicing, focus on adding details to sharpen your skills. Then, when you’re ready to make an actual wooden gift, you can simplify it. Over time, that’s how you’ll develop your own carving style.


