Carve Characters into Wooden Gifts: Shape Blocking Guide
Hey everyone, it’s Wooden Smile back again! In this post, we’re continuing our focus on turning all sorts of little characters into wooden gifts.
In our last blog, we finished drawing the outline for our wooden figure and figured out which parts we needed to cut away. When we made the mushroom-shaped figure, we used a quick-cut saw. Today, we’re trying a different method to see if we can remove the excess wood even faster.

First, you’ll need a saw and a chisel.
Make sure the chisel is the kind you can tap on the end with a hammer. You’ll also need a hammer—either wooden or metal is fine. And of course, don’t forget your vise to hold the wood block in place.

Use the saw to cut through the vertical wood grain, specifically at the figure’s shoulders and wrists. Be sure to leave a little extra space and don’t cut all the way through just yet.

This is what it should look like after those cuts.

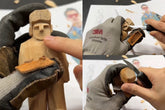
Next, we’ll grab the chisel and use the vertical grain to our advantage, almost like splitting firewood. Take a good look at the grain direction—like in the photo, where the wood grain is angled inward near the tip of the thumb. If you chisel straight down along that grain, you might damage the figure’s face. So, aim a bit outward and leave yourself some wiggle room.

You can use either a shallow gouge or a flat chisel. For this wooden gift, we’re testing both: a 2.5cm flat chisel and a 2cm shallow gouge. Make your cuts just a bit farther out than the lines you sawed earlier. Then pick up your hammer and give the back of the chisel a few taps. If the wood isn’t coming off too deep and you’re still above your line, go ahead and give it another tap or two.

After shaping the figure’s shoulders, we noticed the flat chisel worked a bit faster—it almost sliced through in one go. But honestly, either tool works fine, especially if you’re just starting out.
Now onto the figure’s lower half. Since the feet are wider than the pants, you’ll want to use the feet as your reference when cutting. Like in the image, place the flat side of your chisel right along your cut line.

And just like that, the large chunks of extra wood on all four sides are removed. If you want to clean it up even more, you can keep carving. For finer detail, skip the hammer—you can use just the knife for a more controlled finish.

With that, the rough shape of your wooden gift is done! The sound of the wood shaving away is so satisfying—it really makes you want to give it a try yourself, doesn’t it? Stick with us for more hands-on wooden gift carving tutorials. And if you see something you love, you can order it directly from our shop.


