Carving Wooden Gifts: Finishing the Hair and Head Details
Hey everyone, this is Wooden Smile. We’re continuing our tutorial on how to carve the hair of wooden gifts. A well-crafted hairstyle is an important part of bringing your wooden gifts to life, and this lesson will guide you through finishing the figure’s final hairstyle.
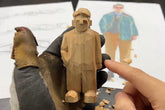
Let’s take a look at the reference drawing. You’ll see that the left side of the hair is lower, while the right side is clearly higher. Also, the sideburns on both sides are very thin compared to the much thicker hair on top, right?

Using this line as the boundary, we’ll separate the sideburns from the top hair. Use your carving knife to thin out the hair below this line.
Just like we saw in the image, we’ll lower the height of the hair on the left side.
The top of the head shouldn’t be flat—otherwise, the figure can look stiff and less appealing. So let’s round it out a bit.
Then smooth out the edges of the hair we just worked on so they look more natural.

Now, let’s refine the jawline. Looking from the front, the figure’s nose looks a little short, but the face seems long. The easiest fix is to narrow both sides of the face so it appears slimmer and more proportional. As long as you find the boundary lines accurately, the overall shape won’t be far off from what you intended.

Next, let’s carve out both ears and the back of the head. First, determine the size of the ears—they should be around 0.5 cm.

Remember in our earlier series of tutorials on carving wooden gifts, we talked about the structure of a figure’s head? Try to recall: the ears should be placed just behind the central vertical line of the head.
Looking at the figure from the side, the top of the head still looks a bit too flat. We need to carve in near the back of the head a bit.
Shape the ears so that the top is wider and the bottom is narrower. That’s how real human ears are—the upper part of the ear (the helix) is usually larger than the earlobe, right?

At this point, we’ve roughly finished carving the figure’s head. Now we can use the width of the head and its proportions to locate the rest of the body. Start by identifying the dividing line between the right arm and the torso. You can lightly sketch this line with a pencil—it will be our first separation line.

In the next post, we’ll talk about how to carve and refine the figure’s body. Stay tuned—we’ll keep bringing you more tutorials to help you learn how to carve your own wooden gifts!
