Crafting Wooden Gifts: Sculpting Arm and Body Details in Your Wooden Figure
Hey everyone, this is Wooden Smile—your go-to team for crafting wooden gifts. Great to see you again! In this post, we’ll show you how to carve the arms and body details of a wooden figure.
Often, the figure we want to make has arms in a bent position, which is more challenging to carve than straight, vertical arms. So how do we get the proportions and connection between the arms and body just right? And what carving techniques make them look natural and anatomically correct? Let’s learn together!
At the end of the last post, we began carving the first dividing line. Now let’s draw a line for the other arm of the wooden figure. Since this arm is bent at the elbow, it’s a bit wider than the straight one.
We’ll start by drawing the separation lines for the torso and the bottom of the shirt. Find the centerline—it helps to define the structure—and then sketch where the sleeve goes. This is just like how we outlined the figure’s form before.

The same principle applies to the back. Start by identifying the dividing lines for each part. These lines help break the figure into segments, which makes it easier to figure out how everything connects.
Now take your carving knife and cut along the lines you just drew—two passes to remove the excess wood. When it comes to the front-to-back relationship between the body and the arm, the body should be higher and the arm lower. So when cutting along the arm area, shave off a bit more wood.
Repeat this on the back—cut once along the guide line, then make a second cut to remove the material.

You can also use a different technique here—use the flat side of the blade to slice off the wood.

Next, we’ll trim down more of the wood so that the torso and the legs sit on the same plane. Do the same on the other side—even though clothing covers part of it, you can move the edge of the shirt aside and carve behind it.

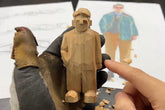
Now let’s work on the arm that’s posed with the hand in the pocket. The relationship here is the same—the arm sits slightly behind the torso. Notice the spot where the blade is pointing—we haven’t cut all the way through, and that’s on purpose. This arm still needs to connect to the leg, so we’ve left some extra space for that.
In our demo, it took two cuts and the wood still didn’t come off. Just a heads-up: when carving your own wooden gifts, if two cuts don’t remove the material, it’s better to make another clean cut than to force it off. Forcing it might crack the wood and ruin the whole piece.
After all these steps, we’ve successfully carved out the curved line of the bent arm. Once you’ve reached this point, you’re in good shape.

At this point, we’ve pretty much covered how to carve the arms of a wooden figure. If you can manage to carve a bent arm, we believe you’ve already picked up some solid skills in making wooden gifts. Keep going!
In the next post, we’ll guide you through finishing the carving of the figure’s entire body. Stay tuned!


