How to Carve Heads for Human-Shaped Wooden Gifts
Through the previous series of tutorials on carving human-shaped wooden gifts, you probably already have a decent understanding of human body proportions. In this blog, we hope to help you better understand the proportions of the head on a wood figurine.
The head is one of the harder parts to carve on a human figurine—especially when you’re doing realistic carving—because the head is small and the facial features are relatively complex.

The eyes are the most visually sensitive part of the face. Even a tiny misplacement can make the whole figurine look off. Luckily, for the wooden gift figures we make, the facial features aren’t that complicated. You just need to understand the relative positions of the features.

When drawing out facial proportions, you can divide the face vertically into three equal parts:
- From the hairline to the brow bone,
- From the brow bone to the base of the nose,
- And from the base of the nose to the bottom of the chin.

Now divide the face horizontally into five equal parts:
- From the left ear to the outer corner of the left eye,
- From the outer to inner corner of the left eye,
- From the inner corner of the left eye to the inner corner of the right eye,
- From the inner to outer corner of the right eye,
- And from the outer corner of the right eye to the right ear.

All five sections are the same width—basically the width of one eye. The width of the nose is about the same as the distance between the inner corners of both eyes.
As for the mouth, the line between the upper and lower lips (the lip seam) is about one-third of the way down from the base of the nose to the bottom of the chin. The rest—about two-thirds of that section—is from the lip seam to the bottom of the chin.
The size and thickness of the lips are totally up to you—some figurines have big mouths, others small, and the spacing can vary as well.

This basic understanding of the front of the face is enough for carving human-shaped wooden gifts. Now let’s move on to the side view of the head.
The most important thing on the side view is the position of the ear. How tall should the ear be from top to bottom? You can use the nose and brow bone as reference points—the ear should line up horizontally with those. That’ll help you set the right ear height.

The ear sits slightly toward the back of the side profile. This helps give your wood figurine’s face a more three-dimensional look.
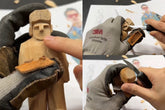
When we’re carving, the head usually starts out as a block. So even if you divide it into thirds vertically and fifths horizontally, it’s still hard to figure out the next step, especially for beginners. At this point, it helps to think of the head as made up of two shapes: a circle and a trapezoid. Shave a bit off the back where the nose is, and the mouth and chin will start to take shape.

Hair has thickness—some people have long hair, others short. To carve hair, you first need to locate where the neck is.

Now let’s draw the ear. If you shift the space between the nose base and the brow bone over to the right, that’s where the ear goes. From the chin, extend outward to form the neck—and now you’ve got the whole face layout in place.


