Wooden Gifts Tutorial: Full-Body Sketching Tips for Human Figurines
In the last post, we went over how to sketch the head of a human-shaped wooden gift on a wood block. This time, we’ll walk you through how to lay out the rest of the body and transfer the proportions from a photo onto the block. Sounds tricky? Not at all—just follow our steps!
Finishing the head sketch of the human-shaped wooden gift
After dividing the head into thirds vertically and fifths horizontally, you’ll be able to easily find the positions of the chin, nose, and forehead. From there, you can lightly sketch in the ears.

The top of the ear lines up with the brow bone, and the bottom lines up with the base of the nose. That gives you the positioning for both ears on your little figurine.
We’ve also found the hairline. The character has a side part—so where does the part go? Just slightly to the left of the nose. The hair is shorter on the left side and longer on the right.


Next, let’s sketch in the width of the nose. It’s better to draw it a little larger at first—you can always trim it down later, but if it’s too small, there’s not much you can do. Now the head of our figurine is pretty much done.

How to draw the body of the human-shaped wooden gift
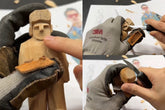
Now let’s move on to the rest of the body. To draw the full figure, we first need to locate the pubic bone. Since the pants in the photo are a bit long, the pubic bone should be slightly above the crotch area.
We use the pubic bone as a reference point to find the boundaries of other body parts. That’s step two of the plan. On the wood block, mark the pubic bone at the center of the remaining five sections.

Because the figure is wearing clothes, not drawn like an anatomy diagram, we need to find the edges of the clothing. The top edge of the coat lines up horizontally with the pubic bone and also with the fingertips—these three things fall along the same horizontal line, so go ahead and mark that.

Once that spot is marked, it’s easy to find the sleeves—they start right at the boundary of the second section. Since we now have the sleeve position, we can extend a line from there. The vest sits above that, so mark that spot too.

The center seam of the vest follows the center line. Sketch out a little angle there—once that angle is set, you can also define the edge of the coat. It’ll sit just to the left of the center line.

You’ll notice that the character’s right sleeve extends down to about the bottom of the pants pocket. Once you’ve found the position of the pocket, you can lock in the sleeve placement—and from there, sketch out the left hand that’s tucked into the pocket.

Let’s say the invisible line running along the figure’s arm is also the edge of the wood block.

The shoulder joint and the edge of the sleeve form a diagonal line—go ahead and draw that diagonal line straight down.

On the left shoulder of the figurine, the sleeve forms a visible angle. Spot the issue? The angle we drew isn’t quite wide enough—it should extend beyond the edge of the block. Don’t worry about it for now—just sketch it out as is. We’ll fix it later.

Now let’s find the position of the shoulders. You can see that they’re sloped, and the collar is a bit higher. Since we haven’t drawn the neck yet, we’ll have to keep the slope a little more subtle.


