Sketching Human Figures on Wood for Custom Wooden Gifts
Want to turn someone from a photo into a one-of-a-kind human-shaped wooden gift? In our previous blog posts, we’ve already introduced some basics on body proportions. So how do we take those proportions and transfer the figure from the photo onto a block of wood? In this post, we’ll show you how to sketch out a human-shaped wooden gift directly on the wood block.

Before you start drawing, there’s one important thing to keep in mind—make sure you know which side of the wood block is the head and which side is the feet.
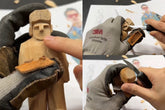
If you want your figurine’s face to be super smooth, you need to cut the wood grain this way before carving. If you go straight in with a carving knife, the chin area becomes fragile and could easily snap off, ruining the entire face of the figurine.

Since the face is such a small area, the margin for error is really small. That’s why we always pay attention to the direction of the wood grain when choosing which way the block faces.

On this side of the wood block, the grain is more vertical, which means I can cut across it and carve out a smoother surface. Once that surface is shaved down, it’s also less likely to break.

Once you’ve figured out which direction is the head, you can officially start sketching. The figure in this photo has a standard 7-head-tall proportion, but the wood block we’re using is sized for 6 heads. First, let’s draw some guidelines on the wood. Start with a centerline, then divide the block into 6 equal sections. This 6-head ratio is what we often use when carving human-shaped wooden gifts.


Since our block is 6 heads tall and the figure in the photo is 7 heads tall, we’ll need to slightly scale down the proportions from the photo.
Next, let’s look at the shoulder-width ratio. The person’s head is about 3 cm wide, and the shoulders are about 7 cm—that’s about two head widths.

Our wood block is 5 cm wide, while the person in the photo is clearly wider. So let’s leave about 0.5 cm of space on each side of the block.

That means the shoulder width of the figurine we carve will be set at 4 cm, and the head will be about 2 cm wide. You can lightly sketch some guidelines onto the block so that you have a visual reference for both the shoulder width and head width.

From there, you can draw the head based on the width of those guidelines. Start by marking where the chin goes, and make sure to leave a little space on each side for the ears.
 Leave some room at the top for the hair. Just find where the hairline should go, then divide that upper third using the method we taught earlier—dividing the face vertically into thirds and horizontally into fifths.


That wraps up today’s lesson. In the next post, we’ll keep working on sketching the human-shaped wooden gift on the wood block and teach you more tips and techniques.


