Wood Carving Ideas: Choose a Project for Your Tools and Skills
A useful wood carving idea is one you can turn into a shape with the tools and control you have now. A rounded carrot or heart tree asks for different work than a bird with overlapping feathers or a character with pointed hair. Start with that difference, then choose the subject you would enjoy making.
For an early decorative project after basic knife practice, start by comparing the carrot and heart tree below. They have fewer kinds of detail than the animals and characters, but still need care at the leaves, base, or narrow trunk. If you cannot yet start and stop a shallow cut reliably, begin with basic whittling cuts before selecting a figure.
Compare the project, the tools, and the difficult parts
Read the tool column as the work the example involves, not as a shopping list for every carving. A ready-sized blank may let you skip stock preparation. The last column matters just as much: a set of finished views can help you judge a shape, while close process photographs or animations give more help with the steps between them.
| Project | Choose it to practice | Tool work | Hard parts and lesson format |
|---|---|---|---|
| Carrot on a base | Broad rounded forms and simple color areas | Carving knife for the tapered body; small carving tools for the leaf divisions. Stock preparation depends on your blank. | Keep the leaf cluster and base connected. Five pictures show the main stages; they do not show every cut. |
| Heart-shaped tree | Rounding a simple outline from several views | Carving knife; a saw only if the stock needs reducing | Protect the narrow trunk. The illustrated stages compare two heart orientations and a solid display base. |
| Bird with feathered wings | Raised wings and repeated small shapes | Tools for the profile roughout and smaller carving tools for the wings | The staggered feather shapes need controlled recesses. Still pictures show the outline, raised wing, and finished detail. |
| Four-legged cat | Coordinating a long side profile with body depth | Small saw and narrow flat carving tools for the leg and tail spaces | Check all four legs and the tail together. The illustrated sequence follows the guide lines, rounding, face, and paint. |
| Fox with a raised tail | Changing flat planes into connected rounded forms | Saw and carving tools | The muzzle, short legs, and tail connection need care. The pictures show new guide lines at successive stages. |
| Mr. Bunny in a coat | An upright figure from front and side drawings | Fret saw and small carving tools | The ears, feet, and coat details are the challenge. This is a short project with broad stages and finished views. |
| Waving polar bear | An intermediate figure with one arm raised | Hand fret saw, secure support, and carving knife | Work around the arm and leg spaces. The animations continue through the final knife cuts; painting is a separate choice. |
| Textured mushroom | A more detailed project using several tools | Saw, vise, carving knives, and gouges; woodburning is optional | The tilted cap, underside, gills, and texture go beyond a simple cap-and-stem shape. The detailed sequence ends after the optional woodburning. |
Start with fewer kinds of detail
When comparing beginner wood carving projects, look past the subject name. Count the parts that stick out, the narrow spaces you must reach, and the features that need to match on opposite sides. A familiar cartoon can be harder than an unfamiliar animal if its hair, ears, or fingers are thin.
Carrot: broad shaping with a few divisions
The carrot project keeps the leaves, tapered body, and base in one block. Choose it to practice looking at the front and side together, reducing broad corners, and dividing a small leaf cluster. Orange and green separate the main parts visually, so you can keep the carved texture simple.

Heart tree: a simple outline with a narrow connection
The heart-tree project is a useful option when you want to keep the wood color and concentrate on shape. The suggested block is 5 × 5 × 10 cm. Compare the upright and inverted hearts before drawing: the design changes where the crown meets the trunk. For the easier connection in this example, start with the conventional upright heart. Keep checking the side thickness while you round the front outline.

Both choices are more manageable when you keep the design broad and leave delicate refinements until the overall form is clear. Neither needs an elaborate painted finish to become a small display gift.
Choose animals by their projections and recessed spaces
For whittling ideas and other small figure projects, a compact body is a helpful starting point, but the details decide the next challenge. The cat adds four leg spaces and a raised tail. The fox asks you to keep a pointed muzzle and short legs while turning the body through several views.
Choose the bird with feathered wings when you want to work on repeated small shapes. First the wing stands above the body; then the staggered feather pattern is carved within it. This is a decorative feather effect, so you can learn the relationship between the rows and the wing without treating the project as a complete realistic-feather course.

If you prefer a figure with a clear pose, compare Mr. Bunny’s close-to-the-body coat shape with the waving polar bear’s raised arm. The bear leaves more narrow spaces around its limbs. Choose it after you can make short controlled cuts and preserve a boundary while removing the wood beside it.
The textured mushroom is another deliberate step up. Its saw and gouge work is part of the project, not an optional detail added to a knife-only tutorial. Choose it because you want to practice the underside and cap texture and have suitable tools for those areas.
Decide how much step-by-step help you need
A good project match includes the kind of instruction you need today. If you want to follow a carving from blank to finished shape, check whether the lesson shows the stages you find difficult. If you mainly want to study a design, a few drawings and finished views may be enough.
The snowman bear combines matching front and side outlines with straight saw cuts outside rounded shapes. Use its downloadable front-and-side reference for the layout, then follow the written instructions for rounding and simple painted details. Choose it after you can control shallow knife cuts and stop where you intend. The photographs cover the layout and rough blank; the later shaping and painting are explained in words.
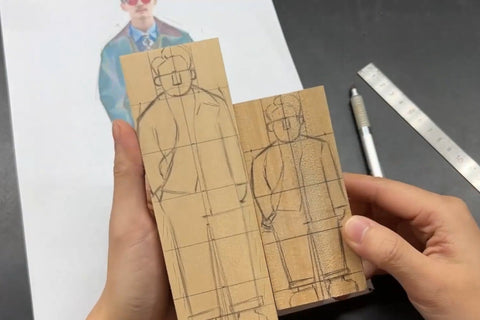
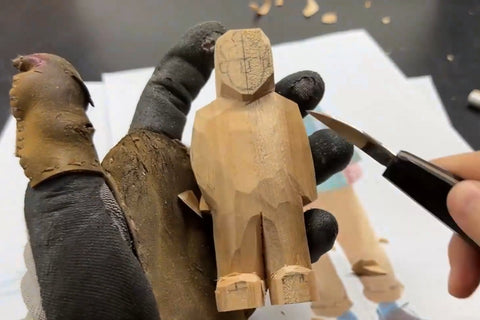
The young Goku carving has process animations, but the pointed hair, narrow neck, hands, and clothing still make it an advanced character study. Bojji is useful for studying six facial and clothing guide lines. These are ideas to work toward or study for proportions, rather than substitutes for first knife practice.
A finished drawing or a photograph of a sketch on wood is also different from a printable pattern. Before relying on a template, check its stated scale, which views it includes, and how those views line up on the blank. Choose the dimensions for the actual project, leaving enough room to shape its narrow parts and reach the recessed areas with your tools.
For a simple shape study before a figure, you can practice shaping a sphere from a block. If drawing a design from scratch is difficult, trace suitable references whose views and scale match your blank. Use a ruler to carry shared height marks onto neighboring faces, then check that the views describe the same three-dimensional form.
Prepare for the project you chose
Once you have chosen the shape, buy or prepare only what it needs. For small knife exercises, begin with a suitable carving knife, sound wood, a pencil, appropriate hand protection, and a way to maintain the edge. A prepared blank can remove the need to saw stock yourself. The beginner carving tools guide explains what can wait until a project gives it a clear job.

Choose cutting tools by their job
A main carving knife shapes accessible surfaces; a smaller or differently shaped tool is useful when a detail gives it a specific purpose. There is no universal requirement to buy the two-knife or four-knife group shown below. Use the knife-selection guide to compare shape, size, grip, and the cuts you want to make.

A saw and vise become useful when there is more waste than you want to remove with a carving knife. Match the saw and blade to the wood and the intended cut, and secure the blank. A broad chisel can remove waste in some setups, but a 20 mm-or-wider chisel is not a general requirement for small carvings.

Treat hand protection and the work surface separately
A cut-resistant carving glove helps protect the hand holding the wood. A cutting mat protects the desk surface; it does not restrain a moving block or make a dangerous blade path safe. Keep your hands and body clear of the edge and its possible follow-through, and use support suited to the operation. Review carving safety before beginning.

Check the edge on scrap before using the project blank. Maintain it according to its condition and the tool’s instructions; every session does not automatically call for sharpening on a stone. The sharpening and stropping guide explains that decision.
Choose the actual block, not just the species name
Basswood is a useful starting point for many small figures because it cuts relatively easily and supports finer details. Balsa can suit broad-shape practice, but its softer fibers can make crisp edges harder to keep. Neither species suits every carving, and choosing balsa solely because it feels softer can be a poor match for thin details.

Inspect the block for cracks, knots, and grain that would run through a vulnerable part of the design. Leave enough clear material for the full shape and the project’s roughing allowance. Use the wood-selection guide for the block itself and the grain-direction guide for narrow connections and projections.
Follow the project from drawing to finished gift
The route below helps you plan the work after choosing a project. Its purpose is to keep the big decisions in order; use the individual project for the actual layout, cuts, and checkpoints.
- Plan the form. Draw the views needed to understand width, height, and depth. Add common height references so the views agree. A pose can be intentionally asymmetric; the guides should preserve the design, not force every side to match.
- Prepare the rough shape. Remove larger waste only where the blank needs it, leaving room beyond the drawing for later adjustment. A ready-sized blank may not need a saw.
- Refine the main volumes. Work on the silhouette and the connected body forms before small features. Turn the carving and compare neighboring views as you remove corners.
- Add the details the design needs. Define the face, wings, clothing, or other features in stages. Some simple shapes need very little detail work; a second knife or gouge should have a specific job.
- Choose the surface. Keep the cut texture, smooth selected areas, or add color according to the result you want. Follow the actual coating’s preparation and application instructions if you use one.


For the first cutting practice, work on a separate block before the gift. Learn to release a thin shaving, stop at a marked boundary, and remove a small chip without tearing past it. The first whittling cuts lesson shows the hand positions and the changes to make when a cut catches or tears.
Keep the finish as simple as the project needs
A natural-wood finish can suit a heart tree, bird, or rabbit. Paint can clarify a carrot’s leaves or a character’s expression. Acrylic color is one option when the product is suited to wood; a white base is optional and depends on the appearance and paint system you choose. It is not a universal first coat for every carving.

Test the surface treatment on scrap of the same wood first. If you add a clear coat, check compatibility with the color beneath it and follow the product’s drying and cure requirements. A coating is not a promise that the carving will never crack or wear. Let the finished surface reach the condition required by the product before handling or wrapping the gift.
Before calling it finished, look at the carving from every side and check how it rests in its intended display position. Settle the large shape first, then decide whether another small detail improves it. For your next project, choose one new challenge—such as raised wings or a more involved pose—while keeping the rest of the work familiar.